Crochet Teddy Bear Amigurumi Free Pattern
Designer:
Instagram: @mommys_Joy_by
Hello everyone who loves amigurumi…
Today I shared the amigurumi teddy bear crochet pattern for you. Below you will find a step-by-step tutorial of this pattern and you will complete it without any difficulty. Thanks to the creator for this cute pattern.

Amigurumi cats, amigurumi dolls, amigurumi dogs, amigurumi unicorns, amigurumi lambs, amigurumi dinosaurs, amigurumi foxes, amigurumi bears, amigurumi giraffes, amigurumi pigs, amigurumi birds, amigurumi bunny, amigurumi elephants, amigurumi hippos, amigurumi monkeys… All the amigurumi toy crochet patterns and ideas you are looking for are here. Have a great time…
Necessary materials
For the bear:
1. Plush yarn with a density of 120m (131 yards) / 100g (for example, Himalaya Dolphin Baby):
– the main color is gray (two skeins of yarn, 1.5 is consumed);
– additional color light gray (for the design of the face).
2. Yarn of any color, density 160m / 50g (for example, Yarnart Jeans) for crocheting patches on paws, belly, head and nose.
3. Crochet hook 4.0 mm.
4. Crochet hook 2.0 mm.
5. Filler.
6. Eyes on a screw mount, black, diameter 10 (or 14) mm.
7. Black yarn, density 160m / 50g (for example, Yarnart Jeans) for embroidery of the mouth, eyebrows and black stripes on patches.
8. Scissors.
9. crocheting marker (you can use a thin yarn of a contrasting color).
10. Needle for sewing on details.
11. Strong yarn for sewing on parts and tightening the face in the color of the bear.
Abbreviations
MR: Amigurumi Magic ring
sc : Single Crochet
inc : Increase
dec : Decrease
tr : Triple Crochet/ Treble Crochet
st: Stitch
dc : Double Crochet
hdc: Half Double Crochet
slst : Slip Stitch
ch : Chain
..in : make increase into same stitch as many as the number which is given in front of “inc” abbreviation (exp; 3inc, 4inc..).
FLO : Crochet into front loops only
BLO : Crochet into back loops only
AMIGURUMI BEAR CROCHET PATTERN
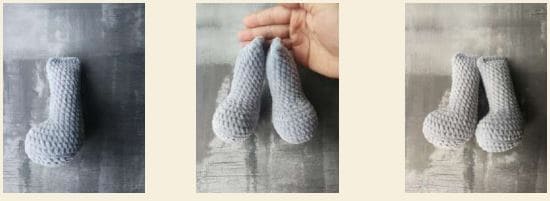
Lower legs (2 parts)
(the main color of the bear’s body is gray).
We make a chain of 7 ch.
1. We crochet from the second loop from the hook: 5 sc, 3 sc in 1 loop, continue to crochet on the back of the chain of ch, forming an oval (sole of the foot): 6 sc. We mark the beginning of the row. (14)
2. inc, 4 sc, 3 inc, 4 sc, 2 inc (20)
3. 1 sc, inc, 4 sc, (1 sc, inc)х3, 4 sc, (1 sc, inc)х2 (26)
4. 2 sc, inc, 4 sc, (2 sc, inc)х3, 4 sc, (2 sc, inc)х2 (32)
5. 32 sc BLO (32)
6-7. 32 sc 2 rows (32)
8. 7 sc, (4 sc, dec)х3, 7 sc (29)
9. 7 sc, (3 sc, dec)х3, 7 sc (26)
10. 7 sc, 6 dec, 7 sc (20)
11. 9 sc, dec, 9 sc (19)
12-24. 19 sc 13 rows (19)
We fill the paw with filler.
Fold the part in half so that the edges are located on the toe and heel of the foot. We crochet the required number of loops from the beginning of the row so that the row ends in the middle of the paw at the back. crochet by grabbing both sides of the crochet 9 sc Cut the yarn.
We crochet the second leg according to the same description
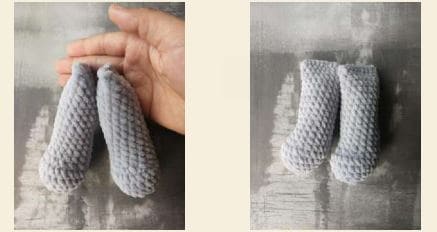
Upper legs (2 parts)
(the main color of the bear’s body is gray).
1. 6 sc in MR (6)
2. 6 inc (12)
3. (1 sc, inc)х6 (18)
4. (2 sc, inc)х6 (24)
5-6. 24 sc 2 rows (24)
7. 6 dec, 12 sc (18)
8-20. 18 sc 13 rows (18)
We fill the paw with filler.
Tie 7 sc from the beginning of the row, fold the piece in half and crochet by grabbing both sides of the piece 8 sc.
We crochet the second paw according to the same description.
Body (crochet from bottom to top)
(the main color of the bear’s body is gray).
1. 6 sc in MR (6)
2. 6 inc (12)
3. (1 sc, inc)х6 (18)
4. (2 sc, inc)х6 (24)
5. (3 sc, inc)х6 (30)
6. (4 sc, inc)х6 (36)
7. (5 sc, inc)х6 (42)
8. 42 sc 42
In the next row we crochet the lower legs into the body. Having tied it to the place where you need to crochet the foot, insert the hook first into the loop on the foot, then into the loop on the body, grab, stretch the working yarn and crochet like a regular single crochet. So we crochet all 9 loops on the foot along with the loops on the body.
Then we crochet along the body (tummy). We do the same with the second paw.
Also, don’t forget to secure the yarn you left on the paw. You can secure it by stretching it several times between the crocheted loops, crochet into loops while crocheting, or by tying a knot on the inside of the body.
9. 10 sc, 9 sc + paw, 13 sc, 9 sc + paw, 1 sc (42)
10. (6 sc, inc)х6 (48)
11-14. 48 sc 4 rows (48)
15. (6 sc, dec)х6 (42)
16-17. 42 sc 2 rows (42)
18. (5 sc, dec)х6 (36)
19-21. 36 sc 3 rows (36)
In the next row we crochet the upper legs into the body. We crochet in the same way as the lower legs. Having tied it to the place where you need to crochet the foot, insert the hook first into the loop on the foot, then into the loop on the body, grab, stretch the working yarn and crochet like a regular single crochet. So we crochet all 8 loops on the foot along with the loops on the body. Then we crochet along the body (tummy). We do the same with the second paw.
Also, don’t forget to secure the yarn you left on the paw.
Make sure that the upper legs are in the same vertical line with the lower legs. If you see that the legs are shifted forward or backward, you need to adjust the number of loops at the beginning of the row.

22. 10 sc, 8 sc + paw, 10 sc, 8 sc + paw (36)
23. (4 sc, dec)х6 (30)
24. (3 sc, dec)х6 (24)
We fill the body with filler.
25. (2 sc, dec)х6 (18)
26. (1 sc, dec)х6 (12)
We continue to crochet the head of the bear.
27. 12 inc 24)
28. (1 sc, inc)х12 (36)
29. (5 sc, inc)х6 (42)
30. (6 sc, inc)х6 (48)
31. (7 sc, inc)х6 (54)
32-33. 54 sc 2 rows (54)
34. (7 sc, dec)х6 (48)
35-36. 48 sc 2 rows (48)
37. (6 sc, dec)х6 (42)
38-39. 42 sc 2 rows (42)
40. (5 sc, dec)х6 (36)
Insert eyes between 37 and 38 rows. For the eyes, visually define the middle of the muzzle. We retreat the same number of loops in both directions and insert the eyes.
41. 36 sc (36)
42. (4 sc, dec)х6 (30)
We fill our head with filler.
43. (3 sc, dec)х6 (24)
44. (2 sc, dec)х6 (18)
45. (1 sc, dec)х6 (12)
Cut the yarn, tighten the hole, hide the yarn inside the head.

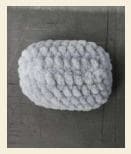
Muzzle
(additional color – light gray).
We make a chain of 9 ch.
1. crochet from the second loop from the hook: 7 sc, 3 sc in 1 loop, continue to crochet on the back of the chain of ch, forming an oval (sole of the foot): 8 sc. We mark the beginning of the row. (18)
2. inc, 6 sc, 3 inc, 6 sc, 2 inc (24)
3. 1 sc, inc, 6 sc, (1 sc, inc)х3, 6 sc, (1 sc, inc)х2 (30)
4. 30 sc
Close crocheting, cut the yarn.
Ears (2 parts)
(the main color of the bear’s body is gray).
1. 6 sc in MR (6)
2. 6 inc (12)
3. (1 sc, inc)х6 (18)
4. (5 sc, inc)х3 (21)
5. 21 sc (21)
Close crocheting, cut the yarn.

Patches for the lower legs (2 parts)
(yarn with a density of 160m / 50g (for example, Yarnart Jeans), the color of your choice).
We make a chain of 12 ch.
1. Crochet from the second loop from the hook: 10 sc, 3 sc in 1 loop, continue to crochet on the back of the chain of ch, forming an oval (sole of the foot): 11 sc. We mark the beginning of the row. (24)
2. inc, 9 sc, 3 inc, 9 sc, 2 inc (30)
3. 1 sc, inc, 9 sc, (1 sc, inc)х3, 9 sc, (1sc, inc)х2 (36)
4. 2 sc, inc, 9 sc, (2 sc, inc)х3, 9 sc, (2 sc, inc)х2 (42)
5. 3 sc, inc, 9 sc, (3sc, inc)х3, 9 sc, (3sc, inc)х2 (48)
Close crocheting, cut the yarn. Leave the tail for sewing.
We crochet the second part according to the same description.

Patch on the belly
(yarn with a density of 160m / 50g (for example, Yarnart Jeans), the color of your choice).
We crochet a square.
1. 6 sc in MR (6)
2. 6 inc (12)
We mark the beginning of the row. In the next row, we begin to crochet the corners of the square.
3. Crochet corner: in one loop sc, dc, sc, then crochet on the side of the square: 2 sc, then again the corner (in one loop: sc, dc, sc), 2 sc (side of the square), in one loop: sc, dc, sc (corner of a square), 2 sc (side of a square) in one loop: sc, dc, sc (corner of a square), 2 sc. (20)
The first row is ready. Then we crochet everything in the same way, but on each side (between the corners) the number of loops will increase by 2 sc. Those. in the next row there will be not 2 sc, but 4 sc between the corners. Then 6 sc, 8 sc and 10 sc.
We crochet a square until there are 8-10 sc on the sides between the corners (at your discretion). Cut the yarn, leaving a tail for sewing.
Head patch
(yarn with a density of 160m / 50g (size, Yarnart Jeans), color at your discretion).
We crochet a square.
1. 6 sc in MR (6)
2. 6 inc (12)
We mark the beginning of the row. In the next row, we begin to crochet the corners of the square.
3. crochet corner: in one loop sc, dc, sc, then crochet on the side of the square: 2 sc, then again the corner (in one loop: sc, dc, sc), 2 sc (side of the square), in one loop: sc, dc, sc (corner of a square), 2 sc (side of a square) in one loop: sc, dc, sc (corner of a square), 2 sc. (20)
The first row is ready. Then we crochet everything in the same way, but on each side (between the corners) the number of loops will increase by 2 sc. Those. in the next row there will be not 2 sc, but 4 sc between the corners. Then 6 sc, 8 sc and 10 sc.
We crochet a square until there are 4-6 sc on the sides between the corners (at your discretion). Cut the yarn, leaving a tail for sewing.

Nose
(yarn with a density of 160m / 50g (for example, Yarnart Jeans), the color of your choice).
We make a chain of 7 ch.
1. Crochet from the second loop from the hook: 5 sc, 3 sc in 1 loop, continue to crochet on the back of the chain of ch, forming an oval (sole of the foot): 6 sc. We mark the beginning of the row. (14)
2. inc, 4 sc, 3 inc, 4 sc, 2 inc (20)
Cut the yarn, leave the tail for sewing.

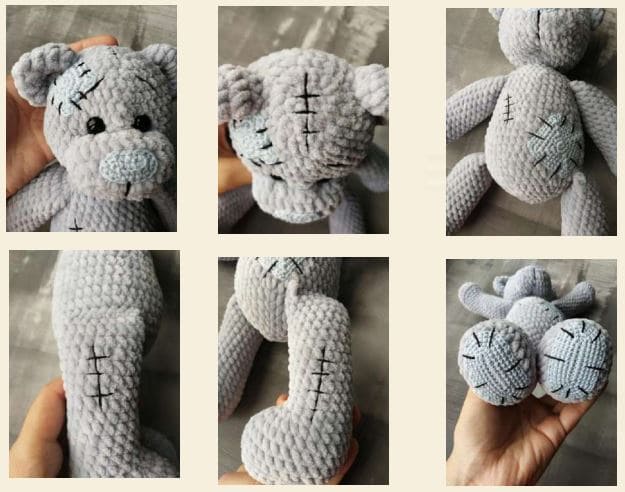
Assembling and decorating the bear
After we have connected all the parts, we proceed to the assembly. Sew on the details with a thin strong yarn in the color of the bear’s yarn.
We sew the ears to the head.
Place the ear on the side of the head. Make sure that the ears are in a vertical line with the feet.
Sew on the muzzle.
Place the top edge of the muzzle just under the eyes. Sew on with strong yarn. Before you sew to the end, do not forget to fill the muzzle with filler.
Sew the nose onto the muzzle.
Determine the middle of the muzzle and sew on the nose.
Sew on patches on the lower legs, stomach and head.
You can choose any place on the tummy, as well as on the head. In my description, I propose to do as follows:
on the tummy – sew on the left side;
on the head – near the right ear.
Tightening
Next, you need to make a tightening on the eyes.
This requires a long needle and strong yarn.
We introduce the needle in the center at the bottom of the head, as close as possible to the seam of the joint between the head and the body. We bring it out near the right eye from the outside. At the bottom we leave the tail of the yarn, for which we will pull it. We introduce the needle from the back of the same eye and draw the muzzle at the bottom.
We repeat the first step. Lovelycraft.com. When the needle is near the eye, at the same time we pull (slightly, gently) by the tail of the yarn at the bottom and by the needle, we correct the crocheting with our hands, forming a tightening. We do this again so that the tightening holds.
We do the same from the side of the second (left) eye. After the tightening result suits you, we remove the needle from the bottom of the muzzle and tie a knot.
We continue to tighten. Next, we need to bring our eyes slightly closer to each other. We introduce the needle from the bottom of the muzzle and withdraw it from the inside of the right eye.
Insert the needle at the top of the right eye from the inside and draw it out at the top of the inside of the opposite (left) eye. We insert the needle at the bottom along the inner side of the left eye, draw it out on the right eye. Slightly tighten the yarn, adjust the crocheting by hand.
Pull the needle and yarn out from the bottom of the muzzle, tie a knot and hide both ends of the yarn in crocheting.
We embroider eyebrows with black yarn, a mouth on the face, and on all patches we make stitches. We also make stitches on the head, tummy and lower legs.