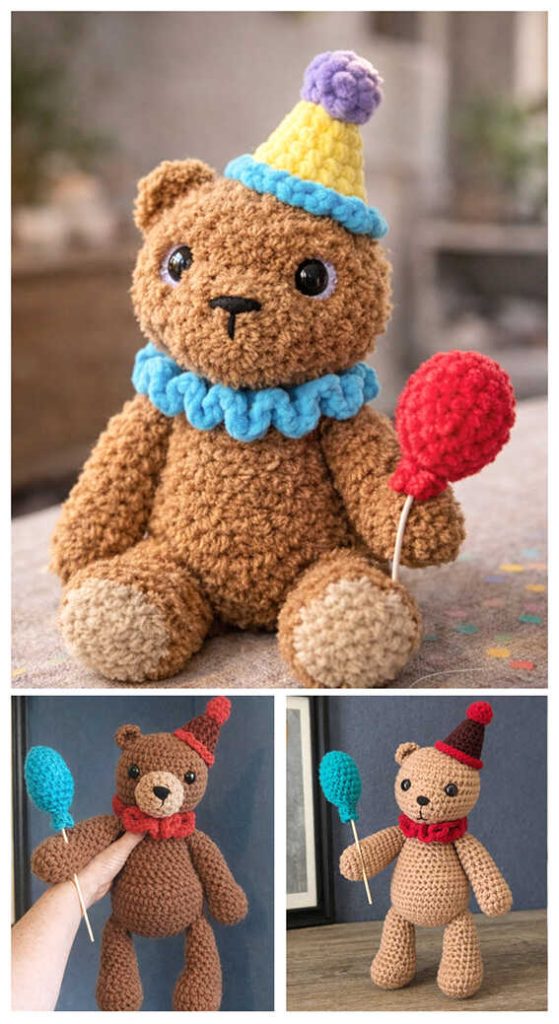
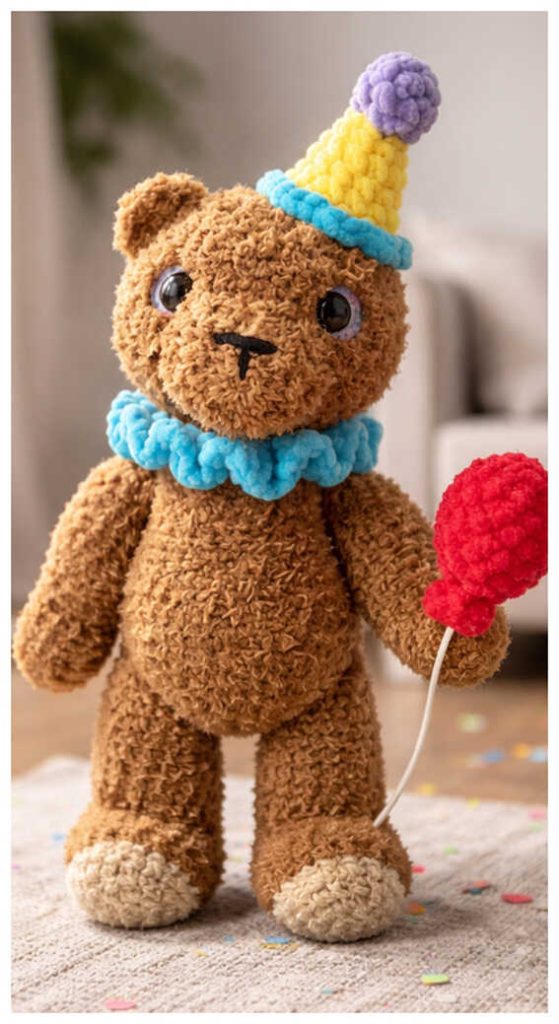
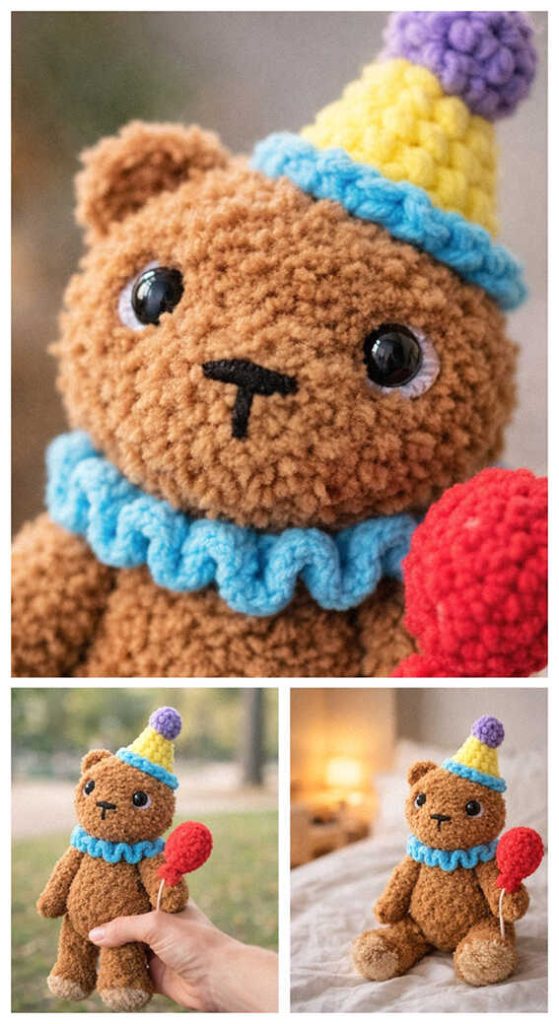
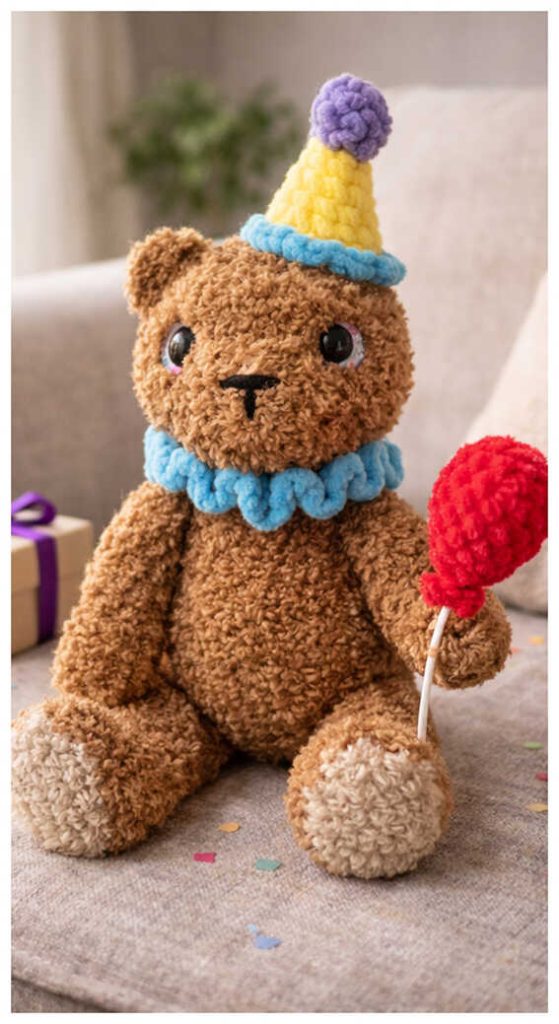
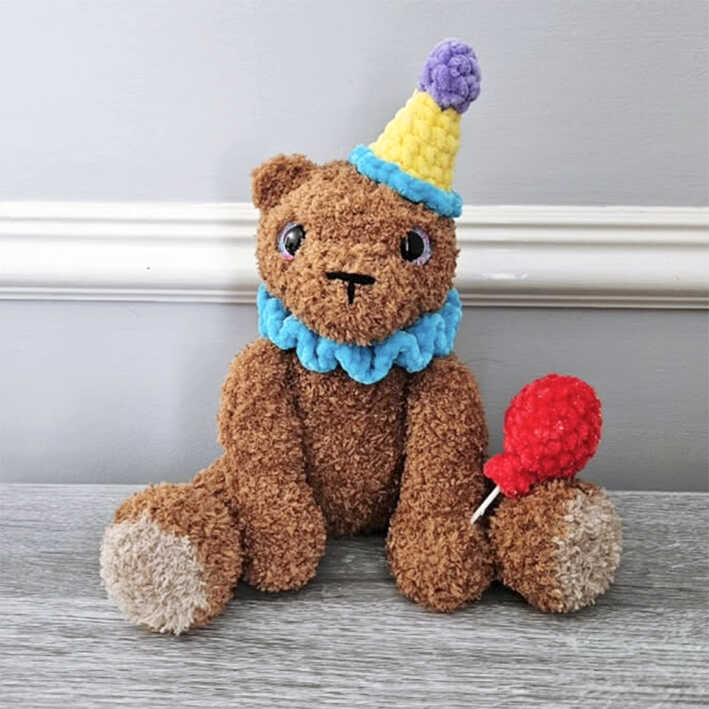
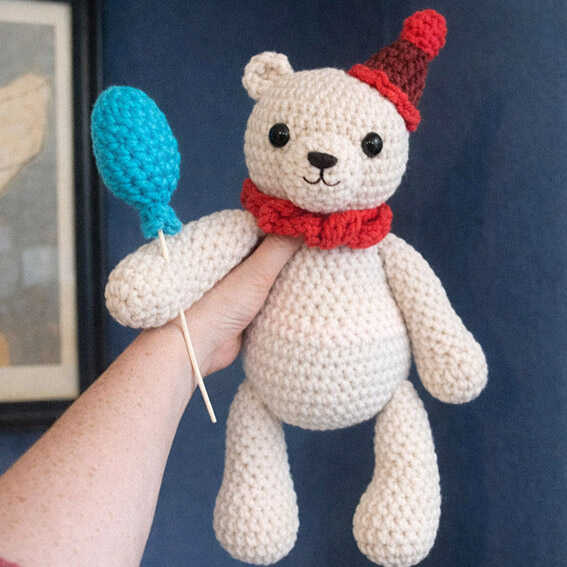
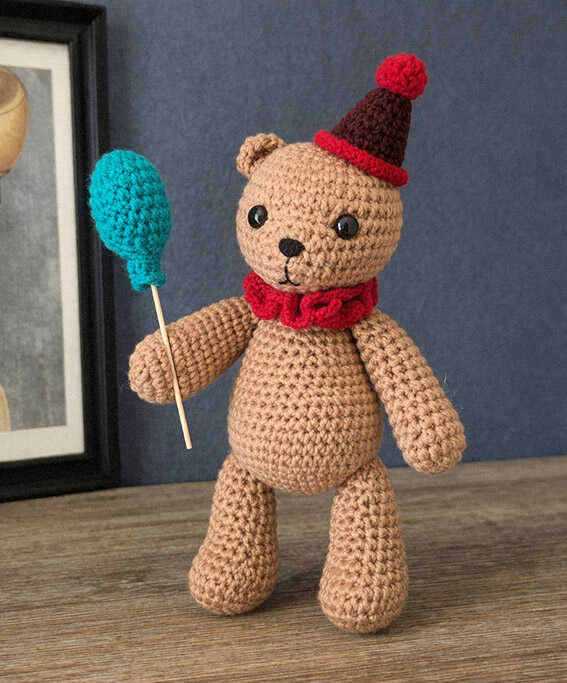
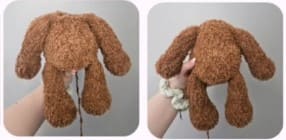
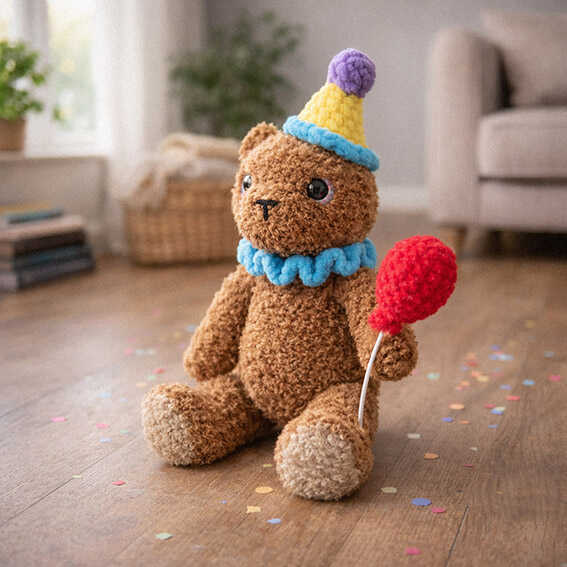
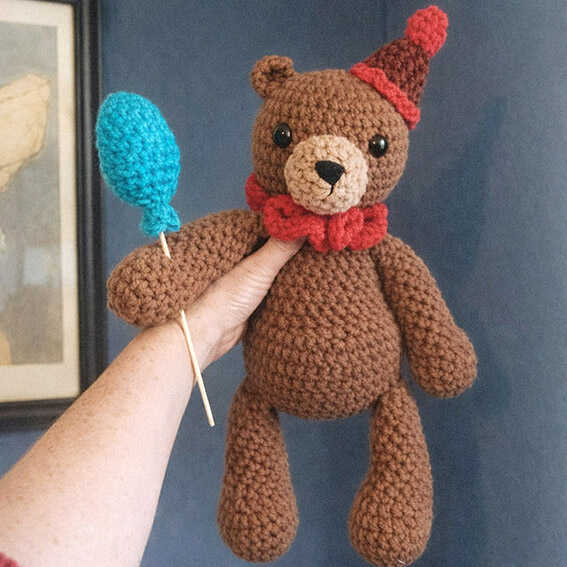
Party Teddy Bear Amigurumi Free Crochet Pattern
Designer: Crochet by Imogen
Instagram: @crochetbyimogen13
Difficulty Level: Intermediate
Ready to crochet a celebration-ready teddy bear full of charm?
A cheerful party-themed amigurumi project to add a fun handmade touch to your crochet time. This free amigurumi teddy bear pattern is designed by crochetbyimogen13 and features an adorable bear with a party hat and a tiny balloon. With its playful look, it’s a perfect choice for DIY Crochet Gift Ideas, birthday decor, or cute handmade toys for kids. Designs like this fit beautifully into Amigurumi Gift Projects, and we sincerely thank crochetbyimogen13 for sharing this delightful teddy bear design. You will also find related amigurumi ideas at the very end of the pattern.
Curious how to make this adorable teddy bear? Scroll down to explore the original crochet pattern.
This pattern uses basic stitches but includes multiple elements like accessories and shaping, making it more suitable for intermediate crocheters rather than beginners. The design is worked with soft yarns and simple techniques, yet the added details like the balloon and party hat bring extra character. If you enjoy cute toy designs, you might also like this tiny bunny shared on one of our blogs.
The pattern is made using yarns like Little Bunny, Honey Bunny Shine, and Jelly Baby yarns with a 4.5 mm crochet hook, creating a soft and slightly chunky texture. You will also need 20 mm safety eyes, stuffing, a lollipop stick, and basic tools to complete the project. If you enjoy fun character toys, you may also like this mini cow shared on another blog as a charming companion project.
Materials:
• Yarn:
‣ Little bunny-brown.
‣ Dk-black.
‣ Jelly baby glitter-blue, purple.
‣ Honey bunny shine- yellow.
• Hook size: 4.5mm.
• Eyes: 20mm.
• Polyester stuffing.
• White paint/ paint pen.
• Lollipop stick/ skewer stick.
Abbreviations:
MR- magic ring
rnd- round
ch- chain
sc- single crochet
inc- increase
dec- decrease
hdc- half double crochet
dc- double crochet
slst- slip stitch
FLO- front loop only
FO- fasten off
CC- colour change
HOW TO CROCHET A PARTY TEDDY BEAR AMIGURUMI
Arms
In brown yarn:
Rnd 1: 8sc in mr (8)
Rnd 2: 8 inc (16)
Rnd 3-5: sc around (16) 3 rounds
Rnd 6: (sc, dec) x5, sc (11)
Rnd 7-17: sc around (11) 11 rounds
Stuff the arm up to rnd 15
Fold the opening in half, close with 5sc, FO leave a small tail to secure later, this will be crocheted onto the body.
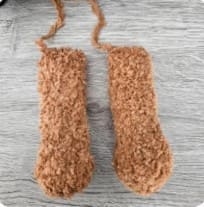
Legs
Start in light brown yarn:
Rnd 1: 6sc in mr (6)
Rnd 2: 6 inc (12)
Rnd 3: (sc, inc)x6 (18)
Rnd 4: (2sc, inc)x6 (24)
Cc to brown yarn:
Rnd 5- rnd 7: sc around (24), 3 rounds.
Rnd 8: 8sc, 4dec, 8sc (20)
Rnd 9: 6sc, 4dec,6sc (16)
Rnd 10: 5sc, зdec, 5sc (13)
Rnd 11- rnd 19: sc around (13), 9 rounds.
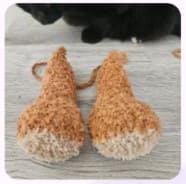
Stuff up to rnd 17
For the remaining of the leg, stuff lightly
Add additional or remove stitches, to get to the centre of the heel, depending on yarn size/tension.
Toes will be facing upwards so the closure should run heel to toe, not side to side.
Fold the opening in half, close with 6sc, FO, leave a small tail to secure later, this will be crocheted onto the body.
Head
In brown yarn:
Rnd 1: 8sc in mr (8)
Rnd 2: 8 inc (16)
Rnd 3: (sc, inc)x8 (24)
Rnd 4: (2sc, inc)x8 (32)
Rnd 5:(3sc, inc)x8 (40)
Rnd 6-11: sc around (40), 6 rounds.
Rnd 12: (3sc, dec)x8 (32)
Rnd 13:(2sc, dec)x8 (24)
Add eyes between rnds 7-8, 6 visible stitches apart.
Rnd 14:(sc, dec)x8 (16)
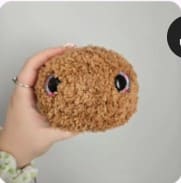
Start stuffing.
Rnd 15: 8 dec (8)
Finish stuffing.
FO leave a long enough tail to close hole and weave in ends.
Ear
In brown yarn:
Rnd 1: 8hdc in mr (8)
FO, leave a long tail for sewing, use the starting tail to place it down then get the other tail you cut, sew the ear on rnds 3-5, 3 stitches away from eyes, tie ends together.
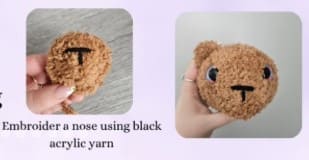
Snout
In brown yarn:
Rnd 1: 6sc in mr (6)
Rnd 2: 6 inc (12)
Rnd 3: (sc, inc)x6 (18)
Rnd 4: sc around (18)
FO, leave a long tail for sewing.
Sew on rnds 7-8 and 12-13.
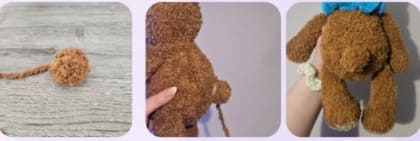
Party hat
Start in purple yarn:
Rnd 1. 4 sc in mr (4)
Rnd 2. 4 inc (8)
Rnd 3. sc around (8)
Rnd 4. 4 dec (4)
CC to yellow:
In yellow yarn:
Rnd 5. 4 inc (8)
Rnd 6. (sc,inc)x4 (12)
nd 7-8. sc around (12), 2 rounds.
Rnd 9. (2sc,inc)x4 (16)
Rnd 10. sc around (16)
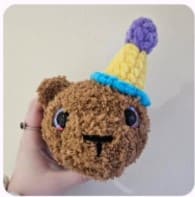
CC to blue:
Rnd 11. FLO (3sc in one stitch, slst in the next)x8
Stuff the pom pom and don’t overstuff the hat, slst in the first stitch you made.
FO, leave a long tail for sewing, sew hat on the top side of the head. I positioned it on rnds 1-2 and 6-7.
Sew with the remaining back loops.
Body
In brown yarn:
The arms and legs will be crocheted onto the body.
Rnd 1. 6 sc in mr (6)
Rnd 2. 6 inc (12)
Rnd 3. (sc,inc)x6 (18)
Rnd 4. (2sc,inc)x6 (24)
Rnd 5. (3sc,inc)x6 (30)
Rnd 6. (4sc,inc)x6 (36)
Rnd 7. (5sc,inc)x6 (42)
In the next rnd, we will be adding the legs, so make sure the back of the foot is facing your stitch marker.
Rnd 8. 6 sc, 6 sc on leg, 11 sc, 6 sc on leg, 13 sc (42) secure the tails.
Rnd 9. (6sc,inc)x6 (48)
Rnd 10-12. sc around (48), 3 rounds.
Rnd 13. 16 sc, 6 dec, 20 sc (42)
Rnd 14. (5sc,dec)x6 (36)
Rnd 15. (4sc,dec)x6 (30)
Rnd 16-19. sc around (30), 4 rounds.
Start stuffing.
In the next rnd we will be adding the arms.
Rnd 20. 6sc, 5sc on arm, 8sc, 5 sc on arm, 6sc (30), secure the tails.
Rnd 21. (3sc,dec)x6 (24)
Rnd 22. (2sc,dec)x6 (18)
Rnd 23. (sc,dec)x6 (12)
Rnd 24. sc around (12)
Finish stuffing.
FO, leave a long tail for sewing. Sew the head on the top of the body.
The back of the head should sit on rnds 21-22. The front should lay on rnds 23-24.
Tail
In brown yarn:
Rnd 1. 6 sc in mr (6)
Rnd 2. 6 inc (12)
Rnd 3. sc around (12)
Rnd 4. (sc,dec)x4 (8)
FO, leave a long tail for sewing. Sew over rnds 6-10, stuff when you have a little gap left from sewing.
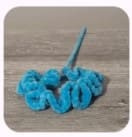
Neck ruffle
In blue yarn:
If you need to add more or less ch depending on yarn size/tension, please do.
Ch 28
Rnd 1. starting from the 2nd ch from the hook 3 dc in each ch.
FO, leave a long tail for sewing. Sew the ruffle around the neck.
Balloon
In red yarn:
Rnd 1: 4sc in mr (4)
Rnd 2: 4 inc (8)
Rnd 3: (sc, inc)x4 (12)
Rnd 4: sc around (12)
Rnd 5: (2sc, inc)x4 (16)
Rnd 6: sc around (16)
Rnd 7: (2sc, dec)x4 (12)
Rnd 8: (sc, dec)x4 (8)
Stuff.
Rnd 9: 4 dec (4)
Rnd 10: sc around (4)
Rnd 11: 4 inc (8)
Sl st in next stitch.
Add additional stuffing if need be.
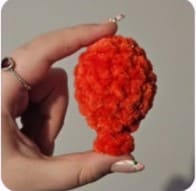
Do a inv FO, leave a long enough tail to weave in. Weave in the tail. Now use a lollipop stick or a skewer, colour it in white paint if its not white already. Cut the stick down to whatever length you want it. Add some glue to the top of the stick, stick the top of stick into the balloon so it is secure. Add glue to a part of the stick, beneath the length you are wanting it. I put mine between rnds 6-7, for the stick coming through the bottom of the arm I stuck it through rnds 1-2. If there are any extra stick popping out of the bottom, you are welcome to cut it.
Save These Pins for Later Inspiration