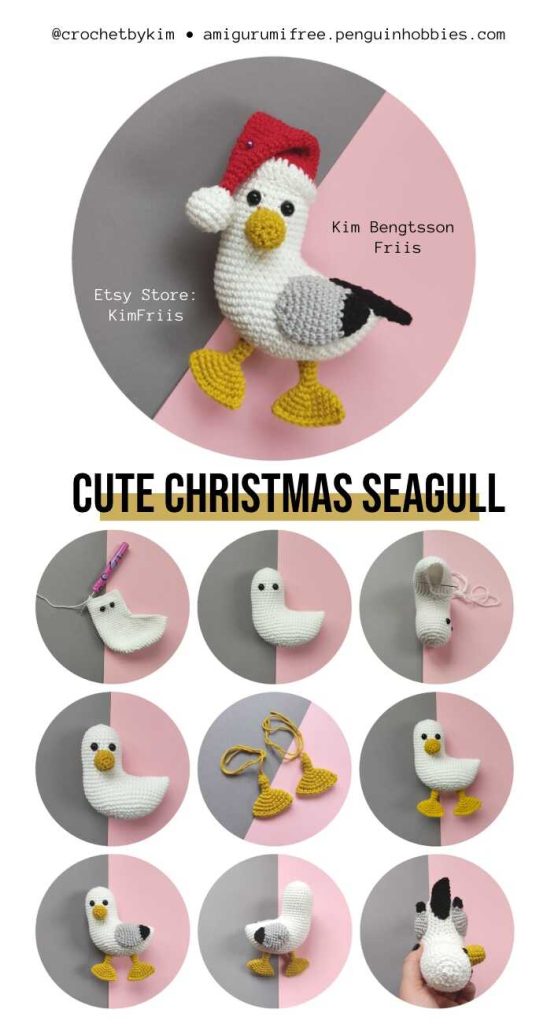
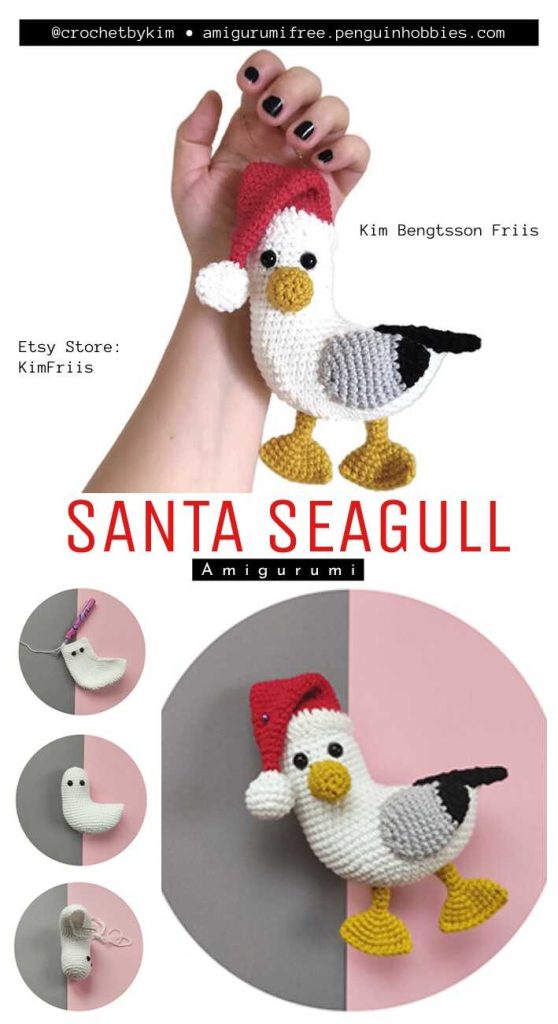
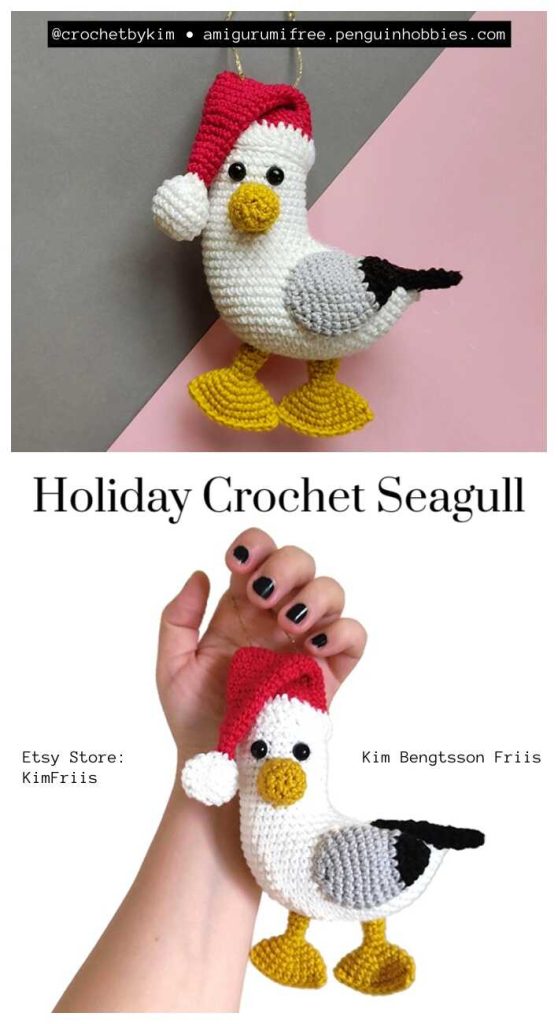
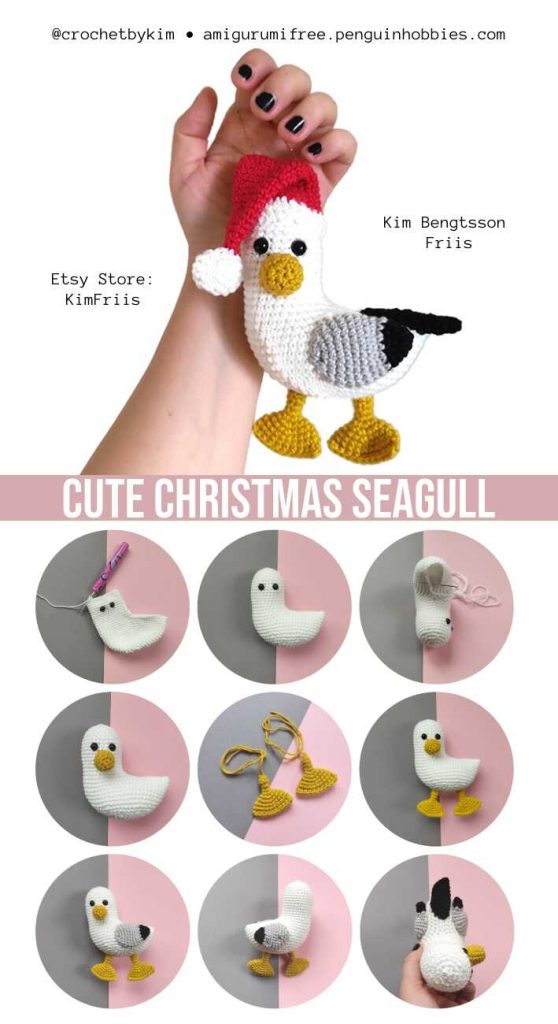
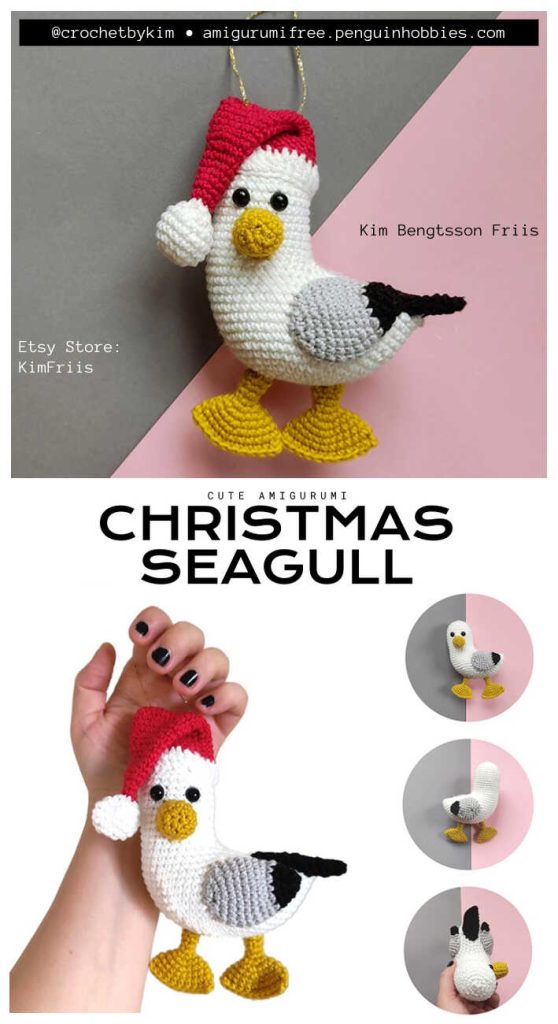
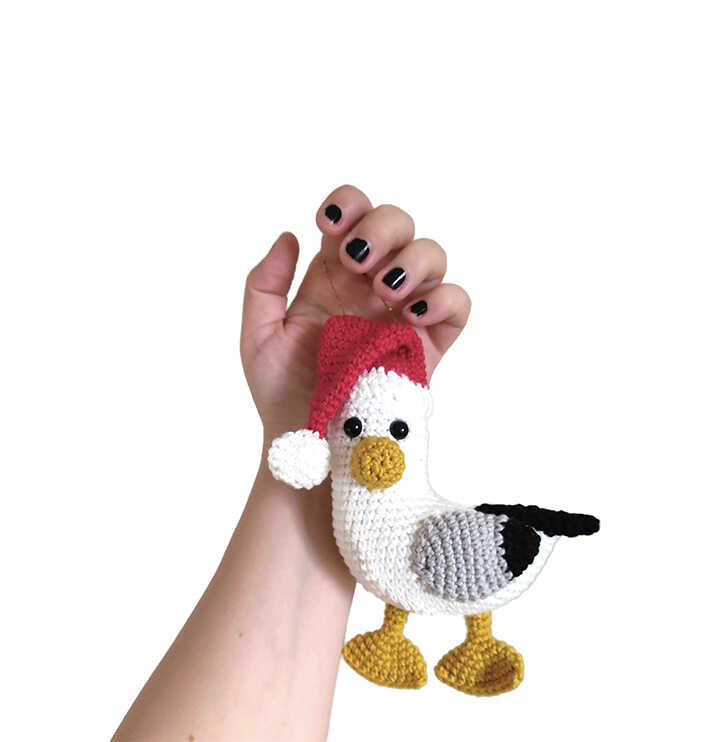
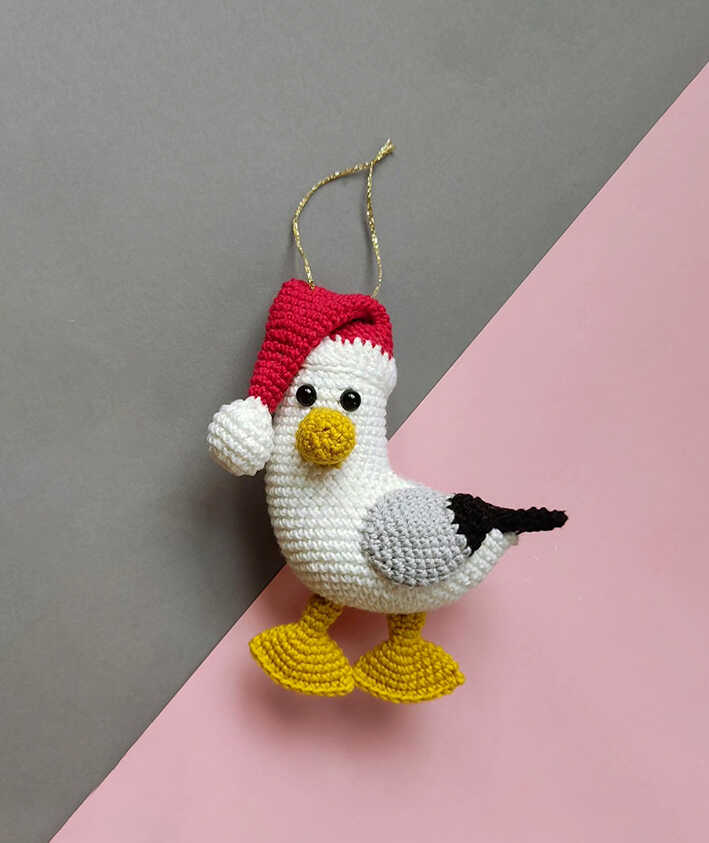
Santa Seagull Crochet Free Pattern
Designer: Kim Bengtsson Friis
Instagram: @crochetbykim
Etsy Store: KimFriis
Difficulty Level: Intermediate
Let’s stitch a little seaside holiday magic…
The Christmas Seagull Amigurumi, also known as Santa Seagull, is a festive little bird wearing a tiny Santa hat, perfect for DIY Crochet Gift Ideas, Easy Crochet Projects, and even fans of Low Sew or No Sew Amigurumi Patterns as a cheerful holiday accent. This playful design also includes wonderful amigurumi seagull ideas at the end of the pattern to inspire more creations. A smart SEO pick for winter makes, and warm thanks to Kim Bengtsson (Ravelry) for sharing this charming free design.
Written in US terms with step by step, beginner friendly guidance, this is an intermediate level project suited for makers with some amigurumi experience, and a truly Quick to Make Amigurumi at about 16 cm long and 7 cm high. If you have been wondering how to crochet an amigurumi bird that looks festive yet stays easy to follow, this how to crochet amigurumi tutorial is a joyful place to start.
You’ll work with white, yellow, black, red, and gray yarn, a 2.5 mm hook, 8 mm safety eyes, fiberfill, stitch markers, pins, a yarn needle, scissors, and a golden thread loop for hanging. While cotton yarn gives crisp stitches, this gull also looks adorable as a soft velvet plushie that turns a bit bigger and cuddlier, and don’t forget to visit the Bear Amigurumi Free Pattern for more beginner friendly inspiration.
Materials
• white, yellow, black, red and gray yarn
• 2.5 mm crochet hook
• 8 mm safety eyes
• toy stuffing (fiberfill)
• stitch markers
• pins
• golden thread for hanging loop (about 15 cm)
• yarn needle for sewing
• scissors
Finished size is approximately 16 cm long and 7 cm high.
Abbreviations
MR – magic (amigurumi) ring
ch – chain
sc – single crochet
slst – slip stitch
hdc – half double crochet
inc – increase
dec – decrease
(…) x n – repeat the instructions in parentheses n times
SANTA SEAGULL AMIGURUMI FREE PATTERN
Head/Body (white)
R1: 6 sc in MR (6)
R2: 6 inc (12)
R3: (1 sc, inc) x 6 (18)
R4: (2 sc, inc) x 6 (24)
R5: (3 sc, inc) x 6 (30)
R6: (4 sc, inc) x 6 (36)
R7: (5 sc, inc) x 6 (42)
R8: (6 sc, inc) x 6 (48)
R9: (7 sc, inc) x 6 (54)
R10–R17: 54 sc (8 rounds)
R18: 15 sc, skip 24 sts, 15 sc (30)
R19–R30: 30 sc (12 rounds)
Insert safety eyes between rounds 25 and 26, with about 2 visible sc between them.
R31: (3 sc, dec) x 6 (24)
R32: (2 sc, dec) x 6 (18)
R33: (1 sc, dec) x 6 (12)
R34: 6 dec
Stuff the body firmly. Close the opening and weave in the ends.
Beak (yellow)
R1: 6 sc in MR (6)
R2: 6 inc (12)
R3–R7: 12 sc (12)
Cut yarn, leaving a long tail for sewing.
Stuff lightly and sew the beak between rounds 20 and 24 of the head/body.
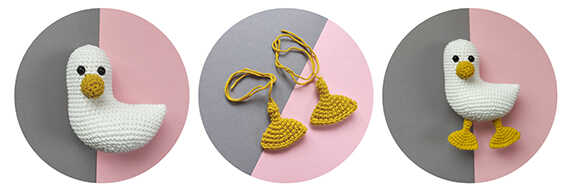
Feet (make 2, yellow)
R1: ch 6, join to form a ring, work in rounds:
R2–R6: 6 sc (6)
R7: inc x 6 (12)
R8: (2 sc, inc) x 4 (16)
R9: (3 sc, inc) x 4 (20)
R10–R11: 20 sc (2 rounds)
Fold in half and sc through both sides 10 sc to close.
Sew feet to the bottom of body with about 5 visible sc between them.
Wings (make 2, black then gray)
Using black yarn:
R1: 6 sc in MR (6)
R2: 6 sc (6)
R3: 6 inc (12)
R4: 12 sc (12)
Switch to gray:
R5: (1 sc, inc) x 6 (18)
R6: 18 sc (18)
R7: (2 sc, inc) x 6 (24)
R8–R11: 24 sc (4 rounds)
R12: (2 sc, dec) x 6 (18)
R13: (1 sc, dec) x 6 (12)
R14: 6 dec (6)
Cut yarn, pull remaining sts tight to close. Do not stuff.
Sew wings to body between rounds 9 and 15.
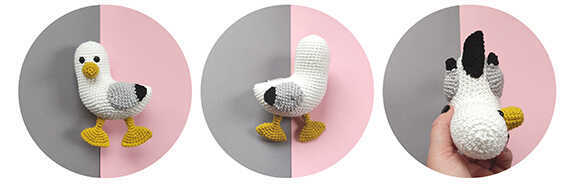
Tail Feathers (black)
R1: 6 sc in MR (6)
R2: 6 inc (12)
R3: (1 sc, inc) x 6 (18)
R4: (2 sc, inc) x 6 (24)
R5: (3 sc, inc) x 6 (30)
R6: Fold the circle in half and sc through both layers 15 sc to close.
Cut yarn, leaving tail for sewing.
Sew to the back of body.
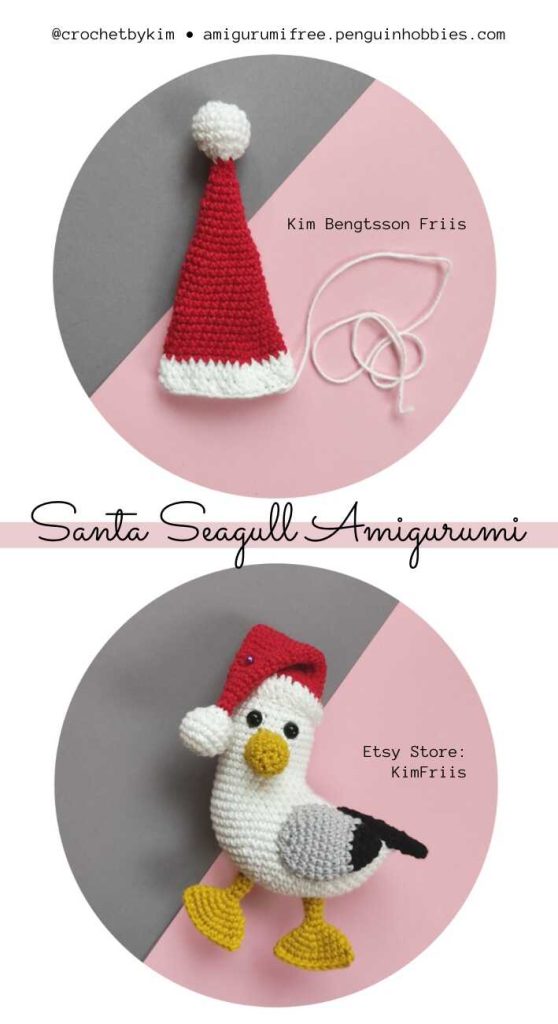
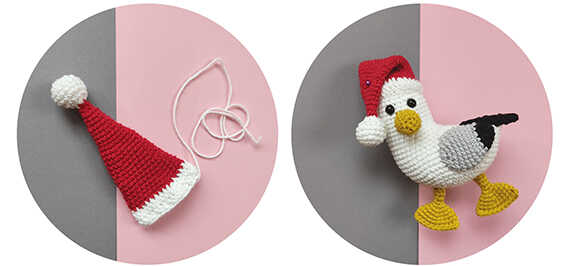
Santa Hat (white & red)
White Brim:
R1: ch 30, join in round, 30 slst (30)
R2–R3: 30 hdc (30)
Red Body:
Change to red yarn
R4: (8 sc, dec) x 3 (27)
R5–R6: 27 sc (2 rounds)
R7: (7 sc, dec) x 3 (24)
R8–R10: 24 sc (3 rounds)
R11: (6 sc, dec) x 3 (21)
R12–R14: 21 sc (3 rounds)
R15: (5 sc, dec) x 3 (18)
R16–R17: 18 sc (2 rounds)
R18: (4 sc, dec) x 3 (15)
R19–R20: 15 sc (2 rounds)
R21: (3 sc, dec) x 3 (12)
R22–R23: 12 sc (2 rounds)
R24: (2 sc, dec) x 3 (9)
R25–R26: 9 sc (2 rounds)
R27: (1 sc, dec) x 3 (6)
R28: 6 sc (6)
Cut yarn and pull remaining sts tight to close.
Pom-Pom (white)
R1: 6 sc in MR (6)
R2: 6 inc (12)
R3: (1 sc, inc) x 6 (18)
R4–R6: 18 sc (3 rounds), stuff lightly
R7: (1 sc, dec) x 6 (12)
R8: 6 dec (6)
Cut yarn, leaving a tail for sewing.
Attach pom-pom to hat.
Finishing
Place the hat on the seagull’s head and sew or glue in place.
Fold the top of the hat to one side and secure with a few stitches.
Thread golden thread through brim to make a hanging loop.
Copyright & Credits
Design and original photo references by @crochetbykim.
This pattern is translated and reformatted for clarity and inspiration only.
If you share your finished Santa Seagull, please credit the designer.
Save for later: